Efficient inventory management on monday.com can often be a tedious and error-prone process. With the Triggerly app on monday.com, you can use the power of QR codes transforms this experience—tracking inventory management on monday.com using Triggerly, stock updates, and purchase orders not only faster but remarkably more accurate. By integrating QR code scanning directly within your monday.com workflows, Triggerly simplifies the process, reducing manual data entry and ensuring real-time updates.
In this guide, we will take you through a step-by-step process on how to create, scan and print QR codes to handle your inventory management for small businesses. Making sure operations become more efficient, error-free, and scalable.
All you need is your mobile phone with any QR code scanner such as Google Lens or inbuilt or third-party QR scanning app to scan QR codes and seamlessly automate inventory processes using Triggerly.
About Triggerly app:
Triggerly is an automation solution that seamlessly integrates with monday.com to handle inventory workflows in real time. Triggerly is made by Jetpack Apps, a specialized solutions partner for the monday.com marketplace that develops productivity-enhancing apps for various business needs.

Why automate Inventory management on monday.com?
Inventory automation is no longer a luxury; it’s a necessity for businesses looking to stay competitive. By automating stock management on monday.com, you can:
- Improve Accuracy: Real-time data updates reduce manual errors and ensure correct stock levels.
- Save Time: Eliminate repetitive tasks like data entry, letting your team focus on higher-level strategies.
- Enhance Scalability: Adapt quickly to new products or warehouses without overhauling your entire system.
- Streamline Reordering: Automatically create purchase orders or send reorder alerts when items dip below a certain threshold.
How to set up automated Inventory Management on monday.com using Triggerly and QR Code Integration?
Below is a step-by-step guide on integrating Triggerly into your monday.com boards to manage stock levels, order fulfillment, and update inventory —all without manual intervention.
Step 1: Install Triggerly from the monday.com Marketplace
Before diving into its implementation and applications, here’s how you can install Triggerly:
Steps:
- Open your monday.com account and go to the monday.com Apps Marketplace.
- Search for Triggerly by JetpackApps.

- Choose the workspace and board where you want to install Triggerly, then click on “Add App.”

4. You’ll now see a list of Triggerly integration templates.
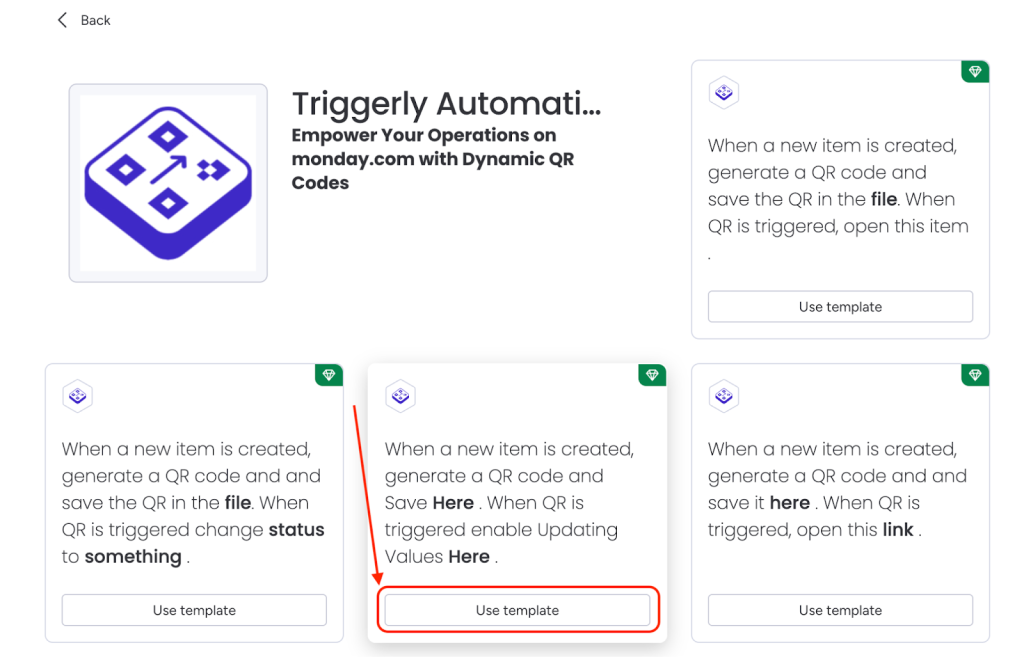
5. Select the template that suits your workflow needs.
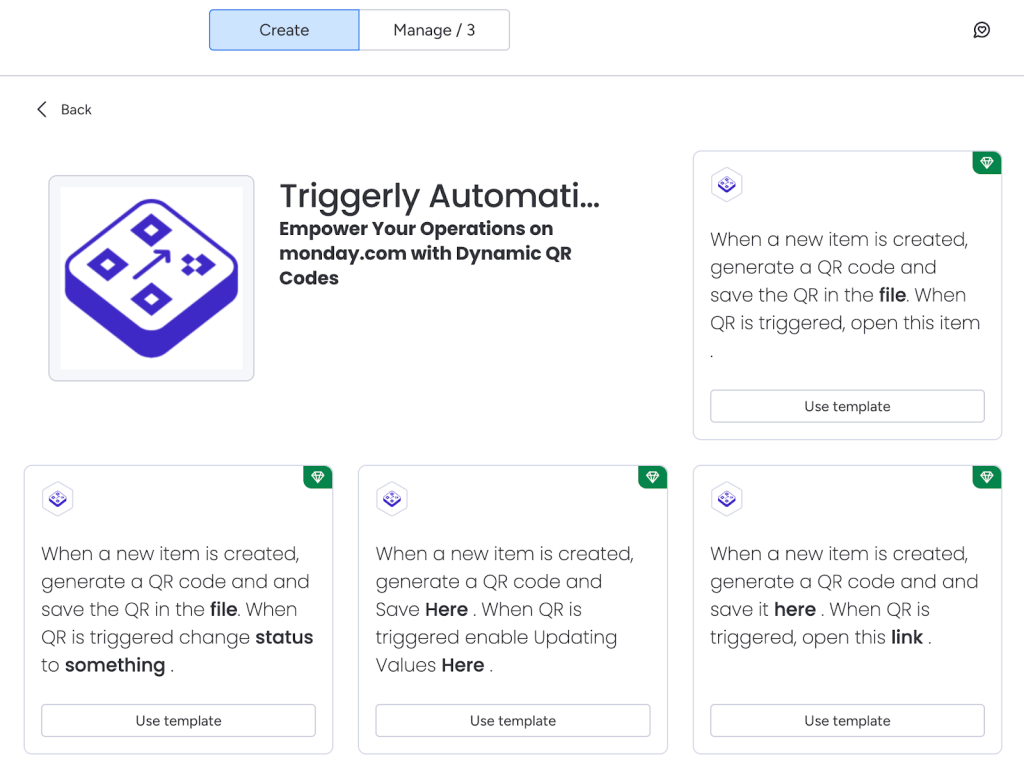
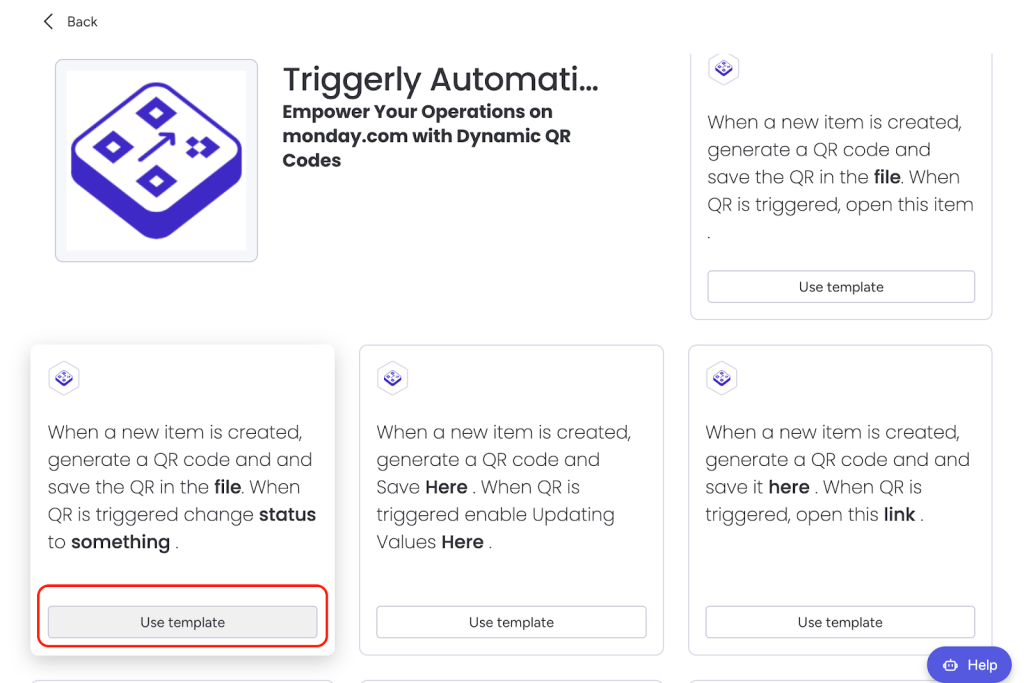
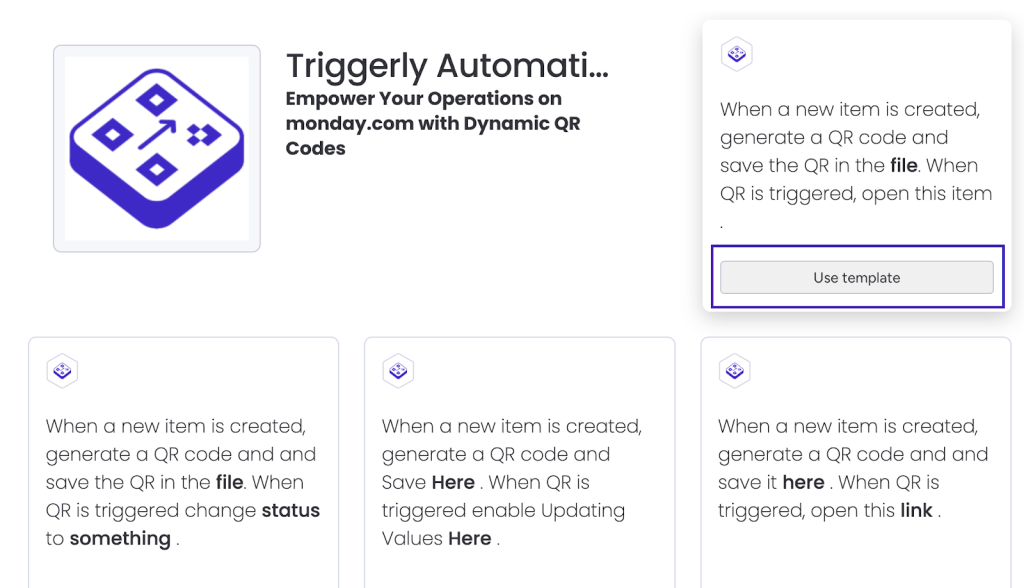
Step 2: Select the Integration template that fits your use-case
- Generate QR code and update board values
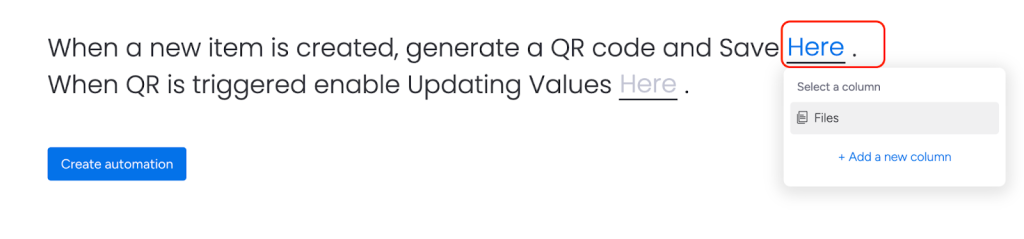
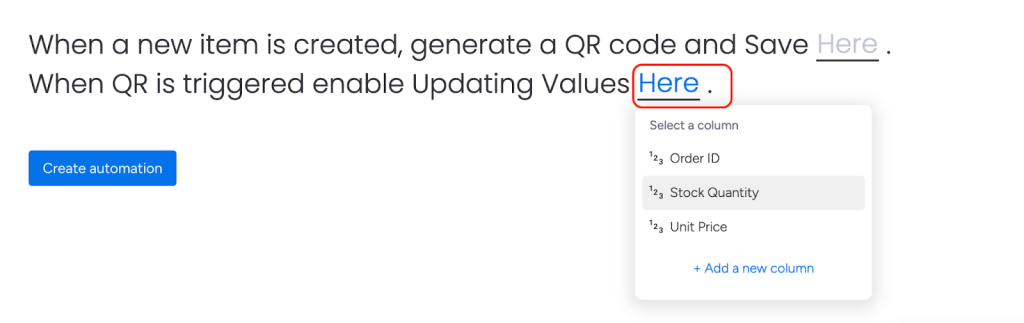
When a new item is created, generate a QR code and Save Here. When QR is triggered, enable Updating Values Here.
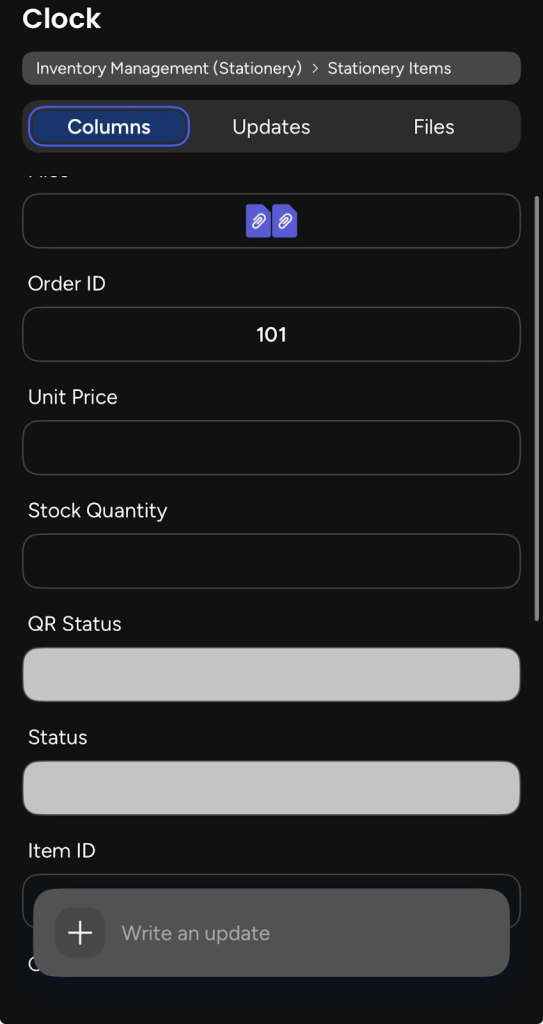
For this process, you need to specify the columns where QR code files will be saved or you can use the existing column that is on your board. These columns are consistently of type ‘File’ on monday, but you can customize the column name after adding the file column to your board.
Additionally, include a number column to assign numerical values or you can use an existing column that is on your board.
Expected behavior:
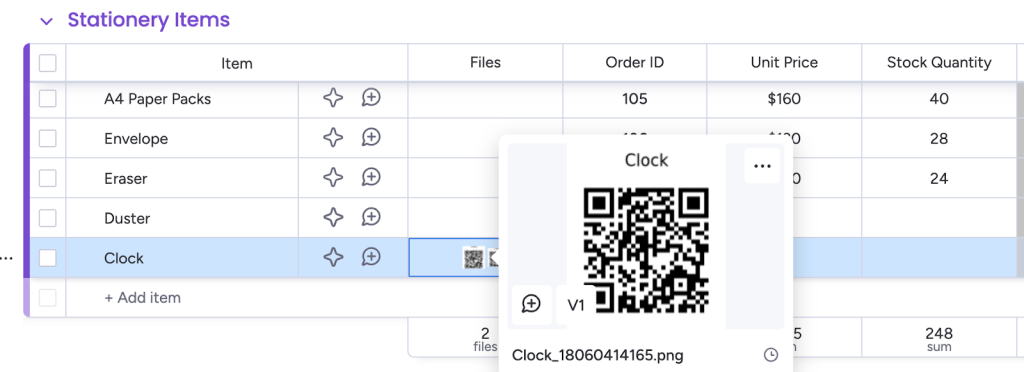
After configuring the integration by adding columns for QR codes, whenever a new item is created on the board, it will automatically generate a QR code in the designated file column.

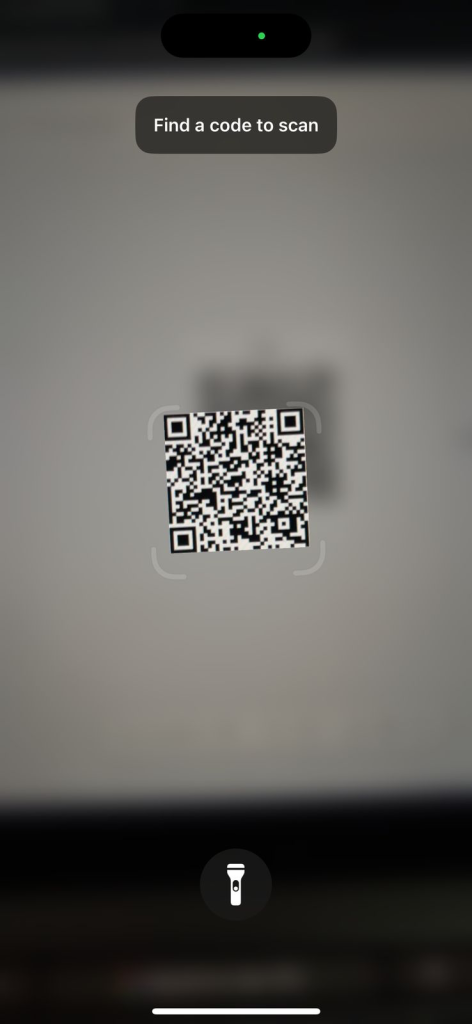
Upon scanning the QR code that is generated on the Files column, with your mobile device using apps like: Google Lens, Camera, QR Code Scanner, a user interface will display to modify/update the numerical value.
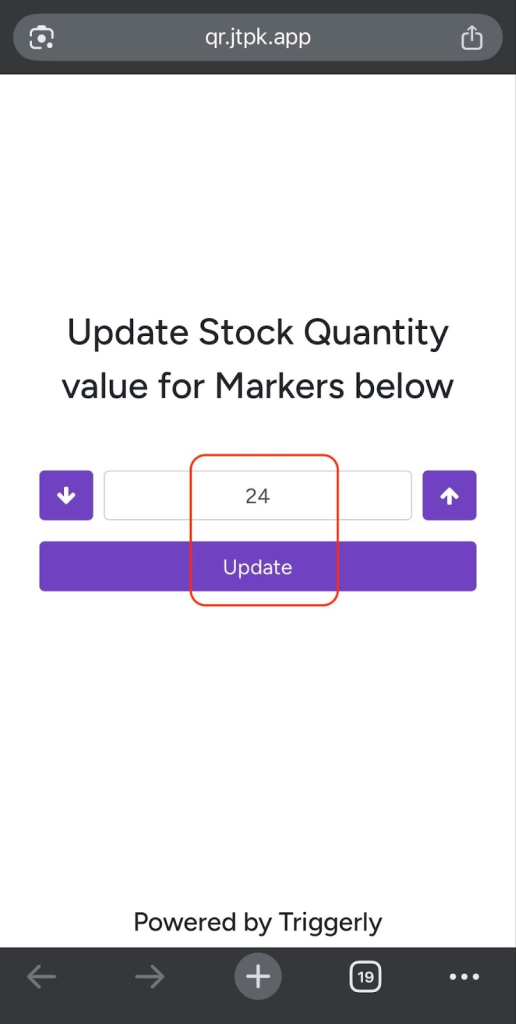
Thus, updating the numerical value from your mobile device should reflect the changes on the Number column on the monday.com board as well.
2. Generate QR code and Update Status Values
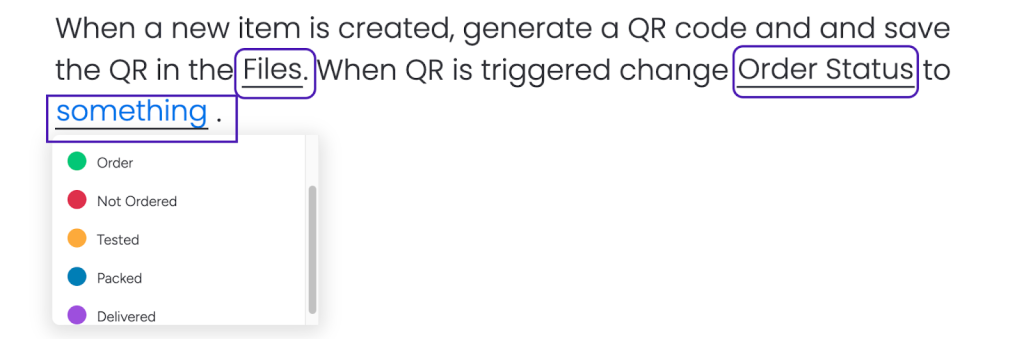
When a new item is created, generate a QR code and save the QR in here. When QR is triggered, change status to something.
For this process, you need to specify the columns where QR code files will be saved or you can use the existing column that is on your board. These columns are consistently of type ‘File’ on monday, but you can customize the column name after adding the file column to your board.
Additionally, select the Status column to set status or you can use the existing column that is on your board. You can create multiple QR codes for triggering multiple Statuses – for example: Tested, Packed, Delivered.
Expected behavior:
After configuring the integration by adding columns for both QR codes and numbers, whenever a new item is created on the board, it will automatically generate a QR code in the designated file column.
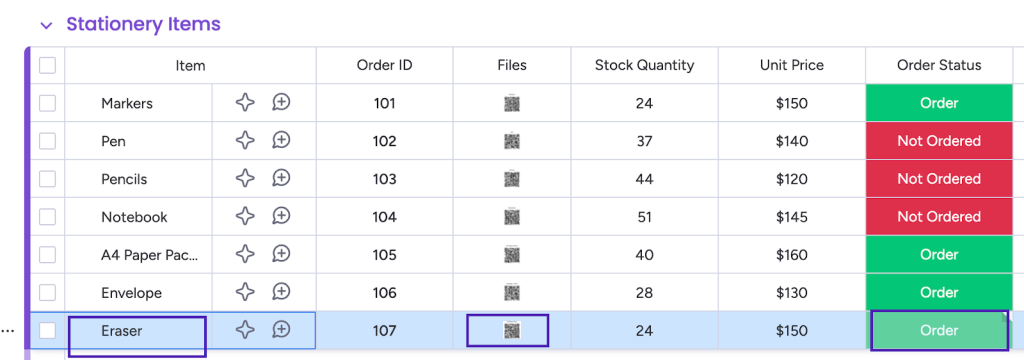
Upon scanning the QR code that is generated on the Files column, with your mobile device, a user interface will display to modify/update the status value.
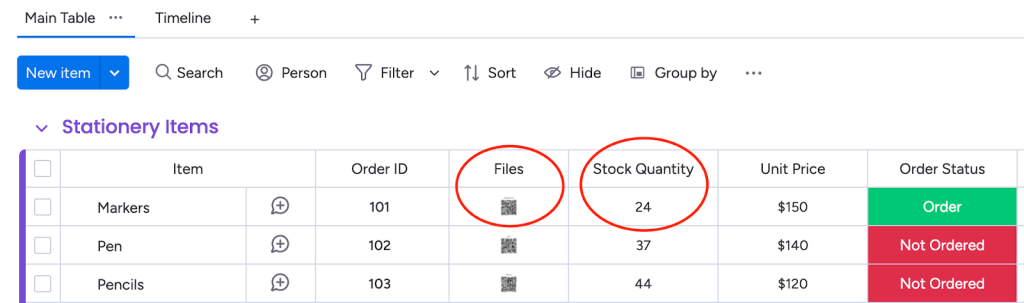
Thus, updating the status from your device should reflect the changes on the Status column on the monday board as well (In screenshot: Here “24” is updated on “Stock Quantity” column, and status is updated to “Order”.
2.1 Use one QR code for changing all statuses in your workflow when scanned
Using just one QR code for triggering different statuses is possible when combining Triggerly and monday.com native automations. This is a common solution for production lines, shipping and asset management use cases.

For this process, you need to install the integrations template shown above or use the one that is triggered when status is changed (recommended when you already have a board with existing items in place).
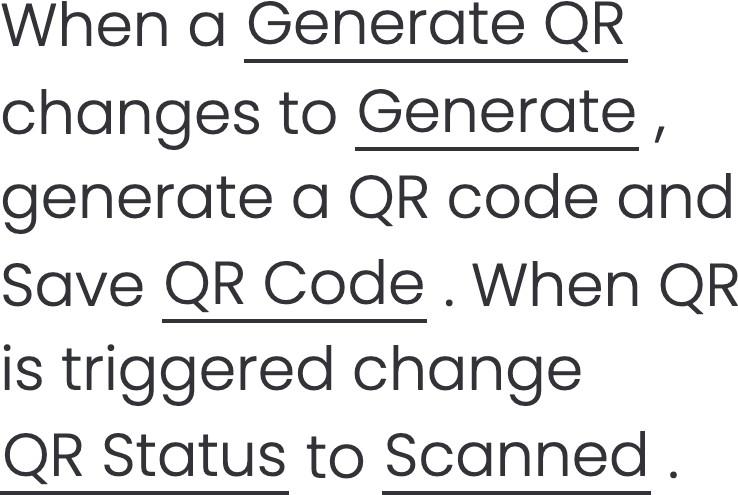
Select “Scanned” as the label that will be triggered when QR code is scanned.
Create a new Status column in your board for all of your workflow steps.

Create an automation that will change the default status of the QR status column to “On Order” (For example) when a new item is created. This is the first step of your workflow.
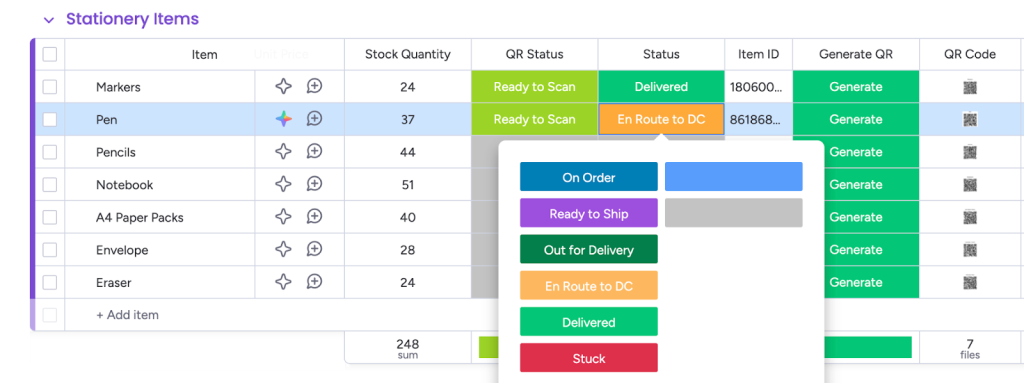
You should now have two status columns in your board. “QR Status” and workflow “Status”. And all of your workflow steps should already be created in your workflow “status” columns. Now it is time to create the automation conditions that will enable you to use one QR code to change your workflow “status” based on the progress of the work flows. See below
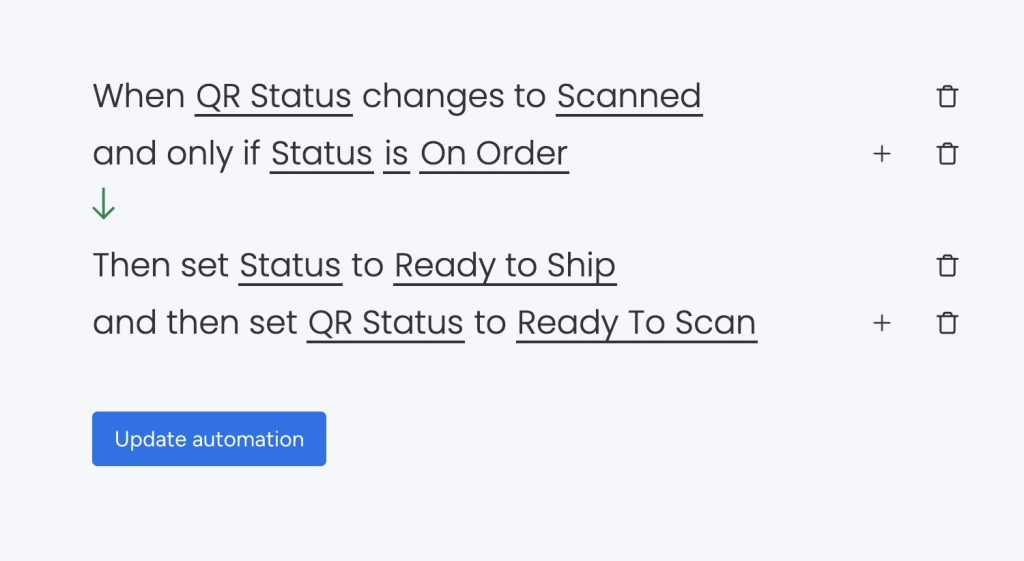
Click on add automation and fill it with the conditions that fits your workflow. In this case, when the status value is “On Order” – The default value – Scanning the QR will change it to “ready to Ship” – and to reset “QR status” back to ready to scan. Save this automation.
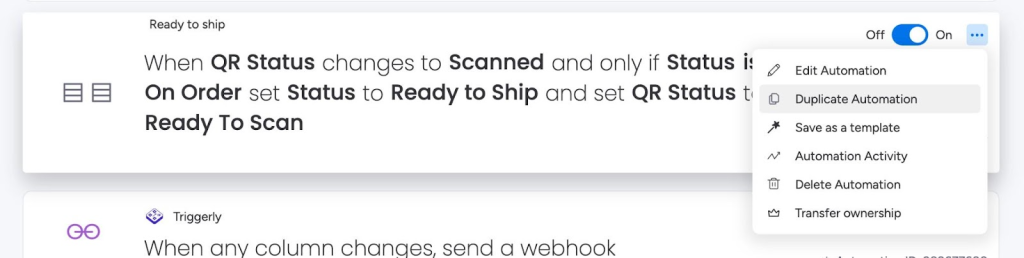
Duplicate it to configure the next step in your workflow.
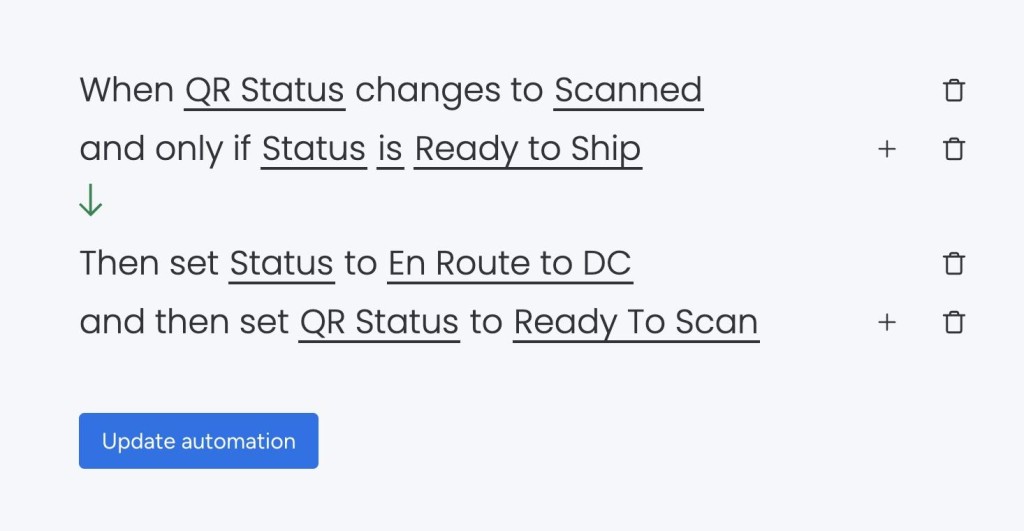
Repeat by configuring the next conditions of your workflow. Once all steps are in place you are ready to use one QR code for multiple triggers of status columns.
Here is a short video demo for configuring one QR code for multiple status columns.
3. Generate QR code and open item
When a new item is created, generate a QR code and save the QR in here. When QR is triggered, open this item.
For this process, you need to specify the columns where QR code files will be saved or you can use the existing column that is on your board. These columns are consistently of type ‘File’ on monday, but you can customize the column name after adding the file column to your board.
Expected behavior:
After configuring the integration by adding columns for QR codes, whenever a new item is created on the board, it will automatically generate a QR code in the designated file column.
Upon scanning the QR code that is generated on the Files column, with your mobile device, a redirect will open to the respective item on your monday board in monday.com mobile application.
⚠ Opening an item in the monday.com app will require having an active monday.com account.
4. Subtract values from number (stock) column when QR code is scanned
When a new item is created, generate a QR code and save the QR in here. When QR is triggered automatically add or subtract value from a number column.
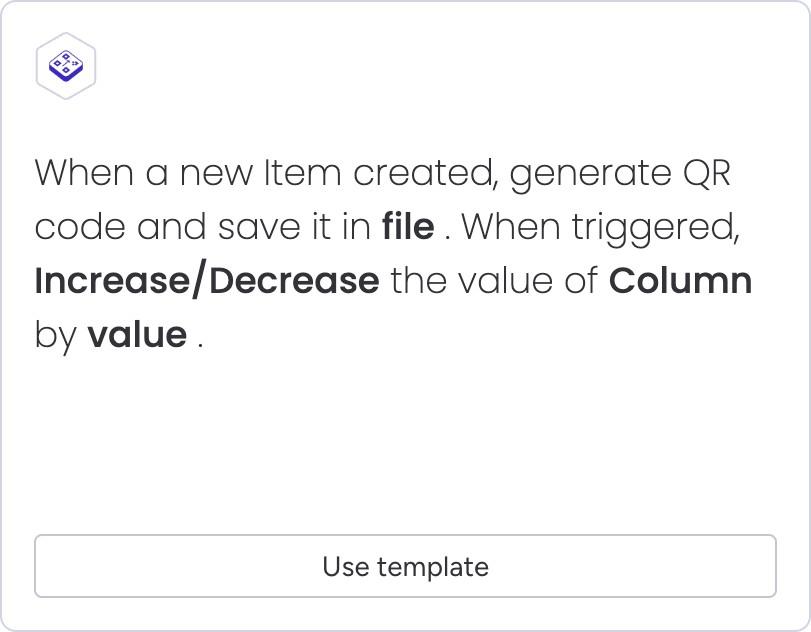
Use this integration template for inventory use cases, for example for when you are picking items from an inventory into an order and need a quick scanning option without inputting values manually. For this you need to specify the columns where QR code files will be saved or you can use the existing column that is on your board. These columns are consistently of type ‘File’ on monday, but you can customize the column name after adding the file column to your board.
Additionally, select the action – increase or decrease, the column you hold your stock value and the value you that is going to be added or subtracted from the stock column.
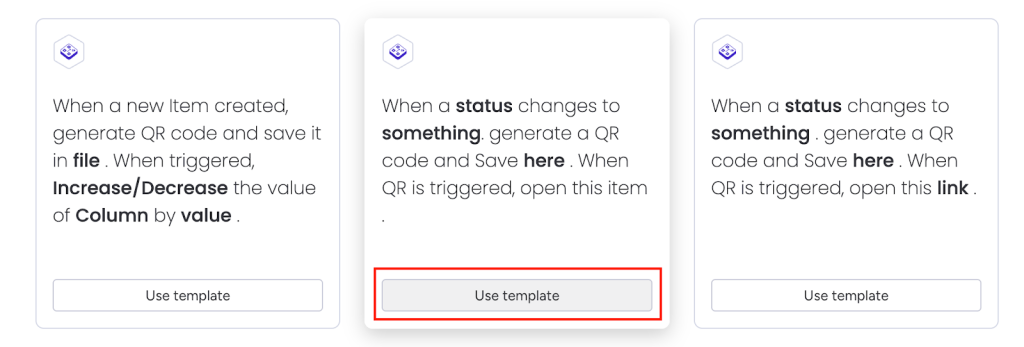
5. Existing items on your boards
Three Integration templates will generate QR codes when status column changes for you to apply on existing items in your boards.
- When a status changes to something, generate a QR code and Save here. When QR is triggered, open this item.
- When a status changes to something, generate a QR code and Save here. When QR is triggered enable Updating here
- When a status changes to something, generate a QR code and Save Here. When QR is triggered, change status to something.
Step 3: Print Your QR codes
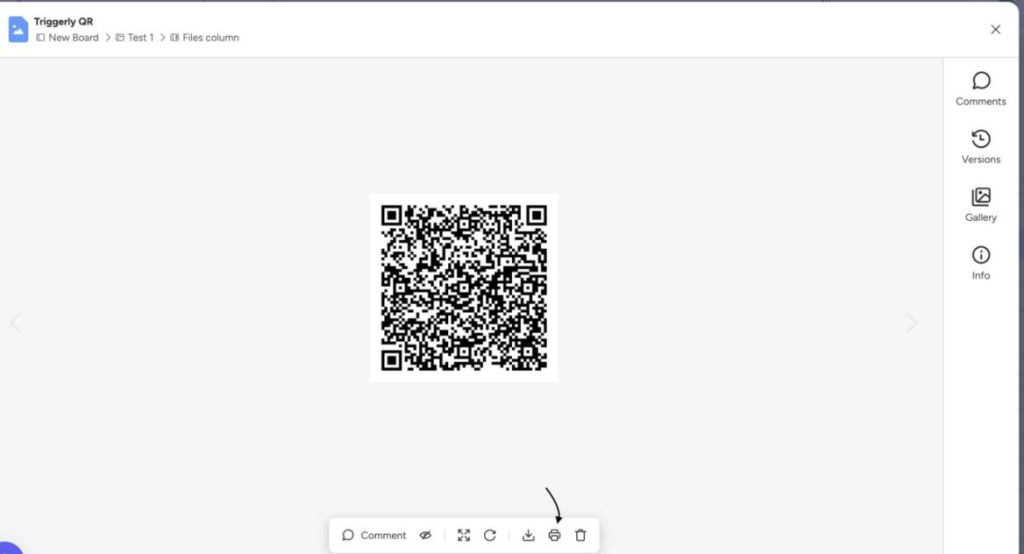
3.1 Print a single QR code
Navigate to the image generated in the Files column. Once you click on the image, you will find the QR code. There, you’ll see an option to print.
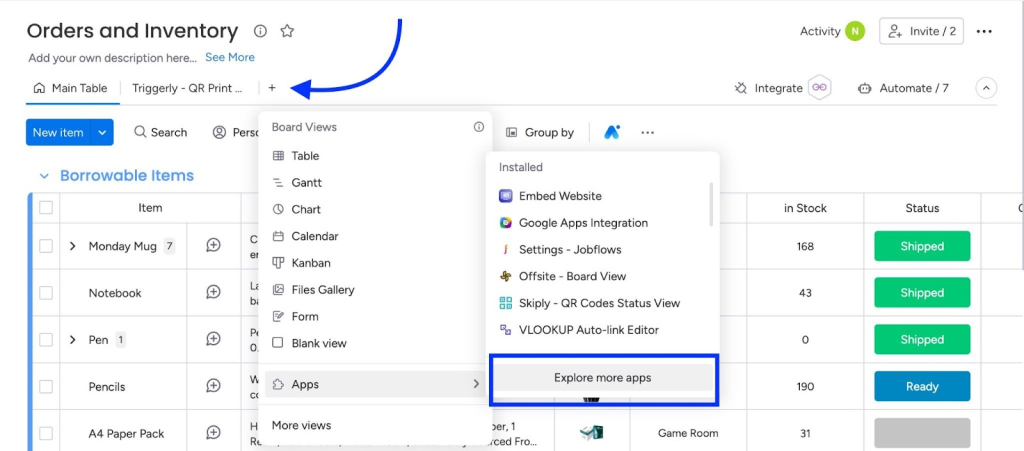
3.2 Print multiple QR codes
- Add Triggerly board view – Click on the “+” icon, go to “Explore more apps” and search for “Triggerly”
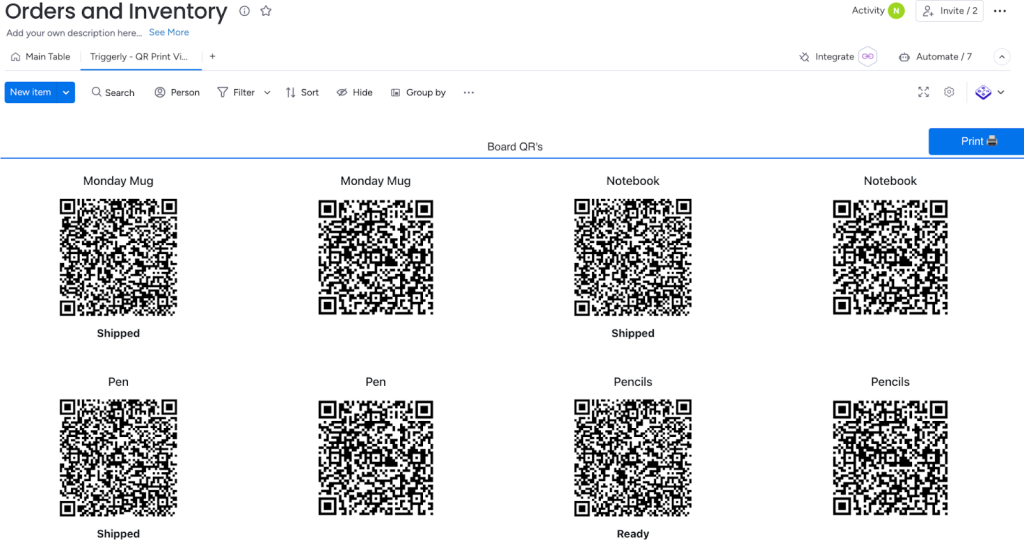
- Navigate to the board view designed for printing multiple QR codes. You’ll find the list of all the QR codes generated on your board.
- Select the desired QR codes directly from the board, or for simply, use the “Filter” feature to filter your selection based on various column fields. For instance, you can filter by group to display and print only QR codes belonging to a specific group.
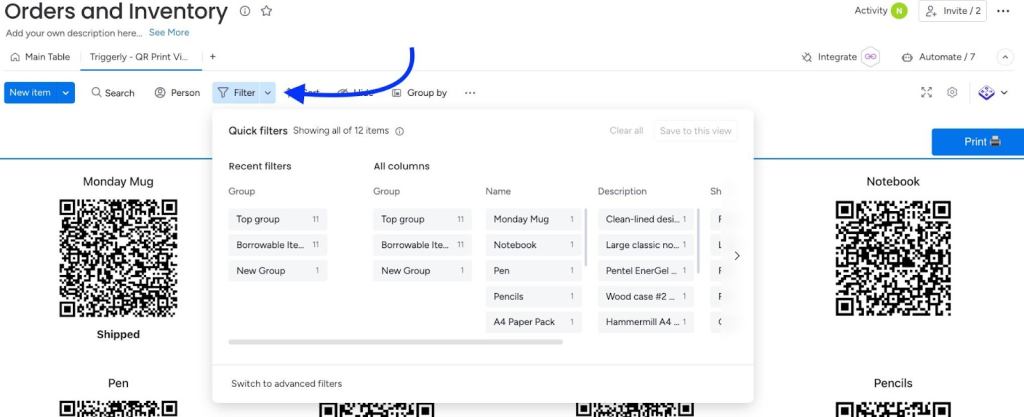
- Once you’ve chosen the QR codes you wish to print, click on the Print option and adjust all the necessary settings to ensure the QR codes are printed accurately.
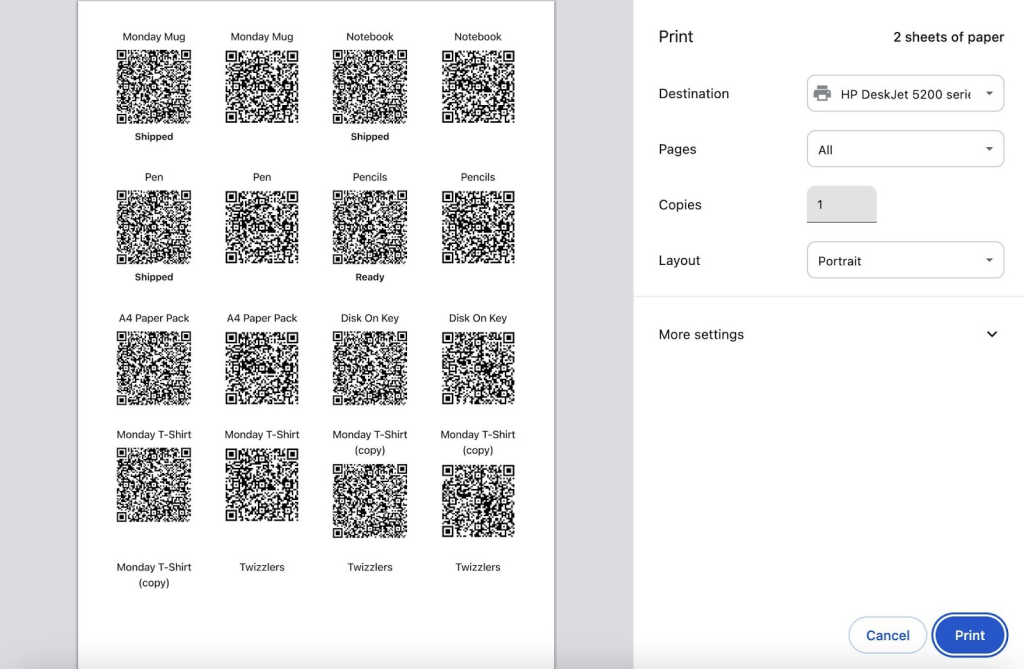
- You’re now ready to print the QR codes.
3.3 Download multiple QR codes in one zip file
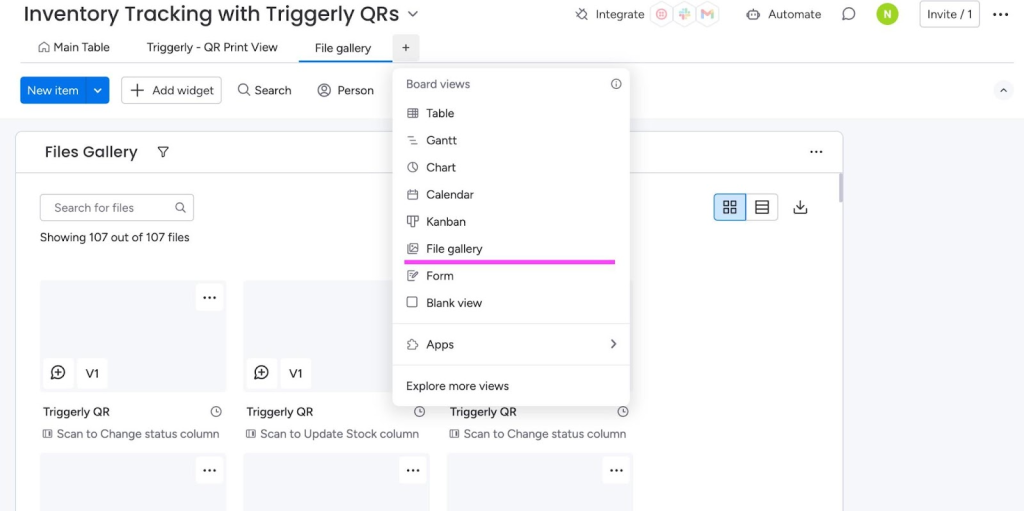
Downloading all QR codes is simple once you add a file gallery view to your monday board. See below

And then click on the arrow at the top right corner of the gallery view. You can also use filters to show and download only the codes that are in the array of your filter. See below
Need help? Fill out this form and we will be happy to assist you.
Use Cases for automated Inventory management Workflows:
Retail & E-Commerce
- Promotional Campaign Sync
Keep your stock data and marketing campaigns in sync, ensuring you never oversell during high-traffic periods.
Manufacturing & Distribution
- Raw Material Management
Automate reorder requests for raw materials based on production schedules. - Warehouse Coordination
Streamline inbound and outbound logistics with real-time stock updates across multiple facilities.
Warehousing & Fulfillment
- Automated Cycle Counting
Assign inventory audits periodically without manual scheduling. - Order Fulfillment
Trigger pick-and-pack workflows in real time when an order is placed or a stock level hits a defined threshold.
Key Benefits of Automating Inventory Management
- Real-Time Visibility: Always know your current stock levels and pending orders.
- Reduced Costs: Prevent overstocking or last-minute emergency orders.
- Fewer Errors: Minimize mistakes caused by manual data entry or oversight.
- Scalability: Easily handle additional SKUs, new warehouses, or international expansions.
Conclusion
Automating inventory management on monday.com with Triggerly helps businesses reduce operational inefficiencies, eliminate human errors, and stay agile in a fast-paced market. By integrating real-time stock monitoring, conditional triggers, and automated purchase orders, you’ll gain deeper insights into your inventory performance while freeing your team from mundane tasks.
Ready to transform your inventory workflows?
- Install Triggerly in your monday.com account.
- Set up triggers for low-stock alerts, purchase orders, or approval processes.
- Test and refine your automation to ensure accuracy.
- Activate and enjoy a scalable, efficient inventory management solution.
With Jetpack Apps powering your monday.com integrations, you can rest assured that your inventory processes are optimized for success—letting you focus on growth, innovation, and delivering exceptional value to your customers.
About Jetpack Apps
Jetpack apps is a monday.com marketplace Gold Partner, developing productivity-enhancing apps that streamline business workflows. With a suite of nearly 20 apps, Jetpack Apps focuses on delivering robust, scalable solutions to help teams optimize their daily operations.